Tuesday, July 30, 2013

Seattle Chop Salad

When I moved from my hometown of Anchorage Alaska I swear I went through withdrawal. No I didn't miss the long frigid winter, I missed a place called the Snow City Cafe. I ate at my favorite eatery at least once a week. My lunch of choice was a piece of brilliance called the Seattle Chop Salad. I would sit at my 7th floor downtown office and literally salivate at the thought of this hearty salad that blends the flavors of roasted chicken, thick bacon, crisp romaine lettuce, tangy blue cheese, and perfectly cooked macaroni noodles that soaked up their sweet home-made vinaigrette.

Now I don't have the Snow City Cafe recipe, and if I did I'm pretty sure they wouldn't appreciate me sharing it. So I've come up with my own version of my favorite salad that's as close as I can get it. I'm resigned to the fact that this will never be THE perfect Seattle Chop Salad, but I must say it's a pretty darn good second, because with each bite I find myself back at my favorite cafe.

I've attached a link to the Snow City Cafe for anyone that may have the chance to visit them in Anchorage. I highly recommend it! They have AMAZING breakfasts also........well, just take a look at the menu posted on their site and you'll see.

You will not regret taking the time to stop in for a meal at the Snow City Cafe! 


INGREDIENTS:

2 med chicken breasts; cooked, diced & chilled
1 C macaroni noodles; cooked, drained & chilled
8 slices thick smoked bacon; fried & crumbled
1 med head romaine lettuce; cleaned, drained & chopped
1 small head green leaf lettuce; cleaned, drained & chopped
2 medium tomatoes; chopped
2 green onions; sliced thin
1 pkg blue cheese crumbles 
1 bottle of your favorite sweet vinaigrette (we use Brianna's Blush)

One of the great things about this dish is you can fix all the items ahead and put them together when it's time to eat. 
  • Bake the chicken breasts sprinkled with your favorite seasoning (I use Johnny's Seasoned Salt) at 350 degrees for aprox 30 minutes or until cooked through. Let cool and dice; set aside until meal time.
  • Cook the macaroni according to package instructions taking care not to over cook. When finished cooking, drain and set aside for later. Mix in aprox 2 Tablespoons dressing to keep the macaroni from sticking together when it cools.
  • Fry bacon until crisp, drain on paper towels and crumble before setting aside for later.
  • Rinse and drain lettuce; chop and set into a bowl, mix in previously cooked & cooled macaroni. Top with chopped & chilled chicken, bacon, tomato and green onion. FYI - the Snow City Cafe version doesn't have green onion, but I love the flavor addition.
  • Sprinkle blue cheese crumbles over the top of salad before serving. Top with dressing when served. 


I hope you enjoy this salad as much as I do.  -- Jenn

Monday, July 29, 2013

Easiest Guacamole EVER

I admit it, I am a snacker. I love to snack....all day. Unfortunately when I succumb to the snacking bug, I don't exactly make the healthiest food choices as well as I have a tenancy to over eat. Now, don't get me wrong, snacking isn't necessarily a bad habit. From what I understand, eating several small meals (aka snacks) per day not only helps maintain blood sugar levels but it also speeds up your metabolism. The key is, this only works as long as you're making healthier choices and keeping quantities small.

With that in mind I've started to make some healthier choices when it comes my snacking, but I've noticed sometimes it takes longer to prepare a healthier snack that it actually takes to eat it. That doesn't work for my busy schedule. This guacamole recipe (if you could call it a recipe, it's more of a "how to") is perfect if you're looking for something quick, tasty, and filling. 

INGREDIENTS:

1 med ripe avocado
2 T of your favorite salsa (I like the Southwest Salsa because it has corn & black beans.)
Tortilla Chips


Peel and pit avocado, cutting into cubes. Mash avocado with a fork in a bowl until creamy. (See photo below.)


Mix in your favorite salsa until well blended.


Serve with tortilla chips of your choice and enjoy!


HEALTHY TIP: I've started reading labels so I know exactly how many chips make a serving. This helps me keep my quantities in perspective so I don't over do it. (Which is easy when there are chips involved.) I also make sure to buy the smaller avocado if I'm the only one eating. The large ones are way too big for a single serving, but are great if sharing.


Thursday, July 25, 2013

Fair Style Mini Corn Dogs

Due to my illness I haven't been able to cook, post or pretty much move for the last week, so PLEASE forgive the delay in getting posts on this blog this week. I'm on the mend but still have minimal energy compared to my usual self which doesn't matter when the kids are hungry. After living off previously frozen meals and canned food for the last week, they're ready to see me back in the kitchen. 

It's not easy being a single parent, especially when you're sick, but I must say the girls were amazing throughout this whole thing. I wanted to make them something we don't have very often and consider a treat, yet something quick and easy so I don't drain what limited energy supply I do have right now. I'm trying to break away from the food-as-a-reward camp but I think I can make an exception this time as a "thank you" for their roll in getting me back on the mend.

Like any hot blooded american, we LOVE fair food, every deep fried bit of it; especially CORN DOGS. Unfortunately, because of their deep fried status, we limit our consumption of these crispy goodies to when we're actually at the fair (go figure). I've been experimenting with several recipes & ingredients and think I've finally come up with the perfect blend of sweet corn breading and the best hot dog. I have toddlers so I'm making these as mini corn dog nuggets (without the stick), but I can't see any reason this wouldn't work for a full blown dog on a stick if you would prefer.


INGREDIENTS:

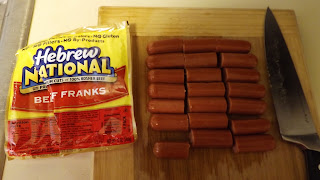
1 package Beef Franks (we LOVE Hebrew National)
21 Popsicle Sticks
1 C yellow corn meal
1 C white flour
1/4 C sugar (not shown in photo)
4 tsp baking powder
1/4 tsp salt
a dash of pepper
a dash of cayenne pepper (not shown in photo)
1 C cold milk
2 Tbsp honey
1 egg
1 - 48 fl oz vegetable oil (for frying)


First cut the franks into threes. Then dry the natural juices off with a paper towel so corn bread mixture will stick to frank during frying process. Place a Popsicle stick through the end of each piece until firmly secure but not so far that the stick shows through the other end. (see photo below)


Mix all other ingredients (except oil) together in bowl to make cornbread mixture. This is easy to do by hand so no need for an actual mixer.


Pour oil into med sauce pan and heat to 350 degrees. If you don't have a thermometer you can tell when the oil is ready by putting a couple small drops of water into the oil before it's hot, when the oil heats up to the point it pops where the water is, then it's ready. 

When oil is at the right temp, carefully insert the dipped frank into the oil, submerging it to the point where the Popsicle stick is inserted. Roll/turn corn dog in oil until evenly browned; place on paper towel covered plate to drain. 


Carefully remove Popsicle sticks and serve with your favorite dipping sauces.

This recipe makes 21 mini dogs if you use the Hebrew National franks. These were a HUGE hit at our table.  Having two young children that don't have very large tummies, we had quite a bit left over so we decided to share with our neighbor boys, ages 8 & 10, and it was a big hit for them too. Their mom didn't waste any time asking for the recipe. 

Thanks for joining us! -- Jenn


Saturday, July 20, 2013

Hearty Lentil Kale Soup

I have to say it's hard for me to justify eating hot soup when it's over 100 degrees outside. Don't ask me why, but for some reason soup is cemented in my mind as only a cold weather dish. But with a persistent cough, stuffy head and a runaway voice, hot nutrient rich soup is exactly what my body's screaming for right now. 

I had the ingredients on hand to make a super easy flavorful lentil & kale soup. The easier the better right now because when my voice ran away it apparently took my energy with it. Another reason I like this recipe is the ingredients are items I usually have on hand. I had also purchased some gorgeous kale, carrots & onions on my last visit to the local Farmer's Market that need to be used up. 


INGREDIENTS:
1 Tbsp light olive oil
1 C (approx 3 med-size) carrots, peeled & sliced
1 small yellow onion, chopped
1 C (approx 2 lg stalks) celery, chopped
1 pound extra lean ground beef
2 Tbsp minced garlic OR 3-4 lg fresh garlic cloves, minced
1/2 tsp Johnny's Seasoned Salt
1 carton (32 fl oz) beef stock, plus one carton water
1 bag (16 oz) lentils, thoroughly rinsed
1/2 sprig fresh thyme (or 1/2 tsp dried thyme)
1 sprig fresh rosemary (or 1 tsp dried Rosemary)
1 sprig fresh parsley (or 1 tsp dried parsley flakes)
2 cans (14.5 oz) diced tomatoes in juice or one large (29 oz) can
2 C chopped fresh green curly leaf kale
(can add additional cup of chopped kale if desired, it looks like a lot but will cook down)
Shredded Parmesan to garnish


Heat olive oil in large skillet over medium heat. Add carrots, onions and celery; saute until onions are turning transparent. Add ground beef, garlic cloves and Johnny's Seasoned Salt, cook until meat is browned. I use a very lean meat so there isn't usually any need to drain, but if using meat with a higher fat content, drain and set aside.


While meat & vegetable mixture is browning; place large soup pot over med/ high heat, pour beef stock into pot plus one additional stock container of water. Add rinsed lentils, thyme, rosemary & parsley. Bring to a boil and boil for 10 minutes.
NOTE: Don't add salt to lentils while cooking because they will become tough.


Reduce heat to medium, maintaining a low boil. Add meat mixture, and canned diced tomatoes. Continue at a low boil for an additional 10 minutes.


Mix in chopped kale. Continue to boil for approx 3 minutes or until kale is wilted.


I made a large pot so I can set half aside and freeze for another day when I'm in need of a back up meal. This recipe should serve 10-12.


Sprinkle shredded Parmesan cheese over soup before serving.

ENJOY! -- Jenn


Thursday, July 18, 2013

Kid Friendly Yogurt Berry Smoothies

I'm always looking for ways to get the kids involved in the kitchen. Especially when it comes to teaching them healthier snack options. It's a hot sunny day so we decided to make one of our favorites, yogurt berry smoothies, before meeting friends for a play date at the park. It's also super easy and quick to make for those busy days when I'm in a time crunch. 

We're using our beloved Magic Bullet to make these individually, but the recipe can also work in a blender if you prefer. 


Gather your ingredients:
  • 1 (6 oz) carton of your favorite yogurt (we chose Yoplait Light blueberry)
  • 1/2 a fresh banana
  • 1/2 Cup frozen strawberry pieces (I always chop & freeze fresh strawberries while in season)
  • 1/4 Cup apple juice (not shown in above picture)


Empty 6 oz carton of your favorite yogurt into individual blending cups.


Dori demonstrates the importance of licking the spoon when done with the yogurt.


Peel and add 1/2 of a fresh banana, then 1/2 cup frozen strawberry pieces to yogurt.


After strawberries are added to cup, pour in 1/4 cup apple juice.


Seal cup with blending top, and attach to base. Blend for aprox 1 min.


Chloe demonstrates how to vigorously shake the blending cup to help ingredients blend thoroughly. I like this method because it's less messy than opening the cup and mixing with a spoon. Plus the kids love the action!


After shaking, attach blending cup to the base again and blend for aprox 30 seconds.
(Dori's a little intimidated by the noise.)


But Dori's not letting the noise get in her way. She wants her smoothie!


Taste test........


Happy campers! A yummy healthy treat they are proud of making (mostly) on their own.


Quick Tip: These smoothies are the perfect base for homemade popsicles too. After blending, just pour yogurt berry mixture into popsicle molds and freeze until solid.

Monday, July 15, 2013

Layered Chocolate Peanut Butter Dessert


I was looking for a great "cool me down because it's 109 degrees outside" kind of dessert that contains chocolate & peanut butter to serve at a little get-together with my neighbors. The chocolate/peanut butter combo happens to be the absolute favorite of a neighbor that's help me out in more than a few pinches lately and I wanted to give her a small token of my appreciation. I needed something fabulous for this so I went to my own personal recipe go-to source, my Grandmother. (Bet you thought I was going to say Pinterest, didn't you?)

My Grandmother relishes any opportunity to open her much loved recipe box and sift through the time worn, hand written, food stained cards. Each with their own story reflected in the way she gently handles them, the mist of memories in her eyes. I know I've gotten my passion for food from this tiny Montana-bred spitfire, and she has never let me down when I need a really great recipe.

As usual, she did not disappoint. Oreo cookie crust, peanut butter filling, cool whip, & chocolate pie filling with candy clusters chilled in layers. I remember her serving this to me after swim class as a kid. The notes on her recipe card said she got it from an Iron Workers Union Picnic. That made me laugh because I guarantee she stuffed recipe cards in her purse before the picnic. Any potential to add a new recipe to her treasured box and she would whip those puppies out, pen in hand, ready to make kitchen magic.


INGREDIENTS:

  • 30 Oreo cookies (or other cream-filled chocolate sandwich cookies)
  • 2 T. butter, softened
  • 1/2 C. creamy peanut butter
  • 1 pkg. (8 oz) cream cheese, softened
  • 1 C. powdered (confectioner's) sugar
  • 1 carton (12 oz) Cool Whip, thawed
  • 1 pkg 4 peanut butter cups OR 10-15 mini peanut butter cups
  • 1 pkg. (3.9 oz) instant chocolate pudding mix
  • 1 C. milk


DIRECTIONS:

  • For Crust: crush 20 cookies and mix with melted butter. Evenly spread into the bottom of an ungreased 8-in x 8-in square baking dish; set aside.
  • In a large bowl, beat peanut butter, cream cheese & powdered sugar with electric mixer until creamy & smooth. Spread evenly over cookie crust.
  • Divide Cool Whip; evenly spreading half over peanut butter mixture. Set other half aside.
  • Crush 5 cookies and chop 2 lg peanut butter cups (or approx. 8 mini peanut butter cups); sprinkle over Cool Whip layer. NOTE: Grandma was also known to add a sliced banana to this layer as an extra flavor kick.
  • In another large bowl, combine pudding mix and milk, beat for 2 minutes. Fold in other half of Cool Whip until thoroughly combined. Spread evenly over candy/cookie layer. 
  • Crumble remaining cookies and chop remaining peanut butter cups; sprinkle over top of chocolate pudding layer. 
  • Chill for at least 2 hours for layers to set before serving - SERVES 12

In no way would I consider this recipe healthy. So for those of us watching our waistline, it's easy to substitute low fat or fat free peanut butter and cream cheese without compromising the flavor. Also substituting sugar free pudding mix reduces the sugar content.

ENJOY! -- Jenn